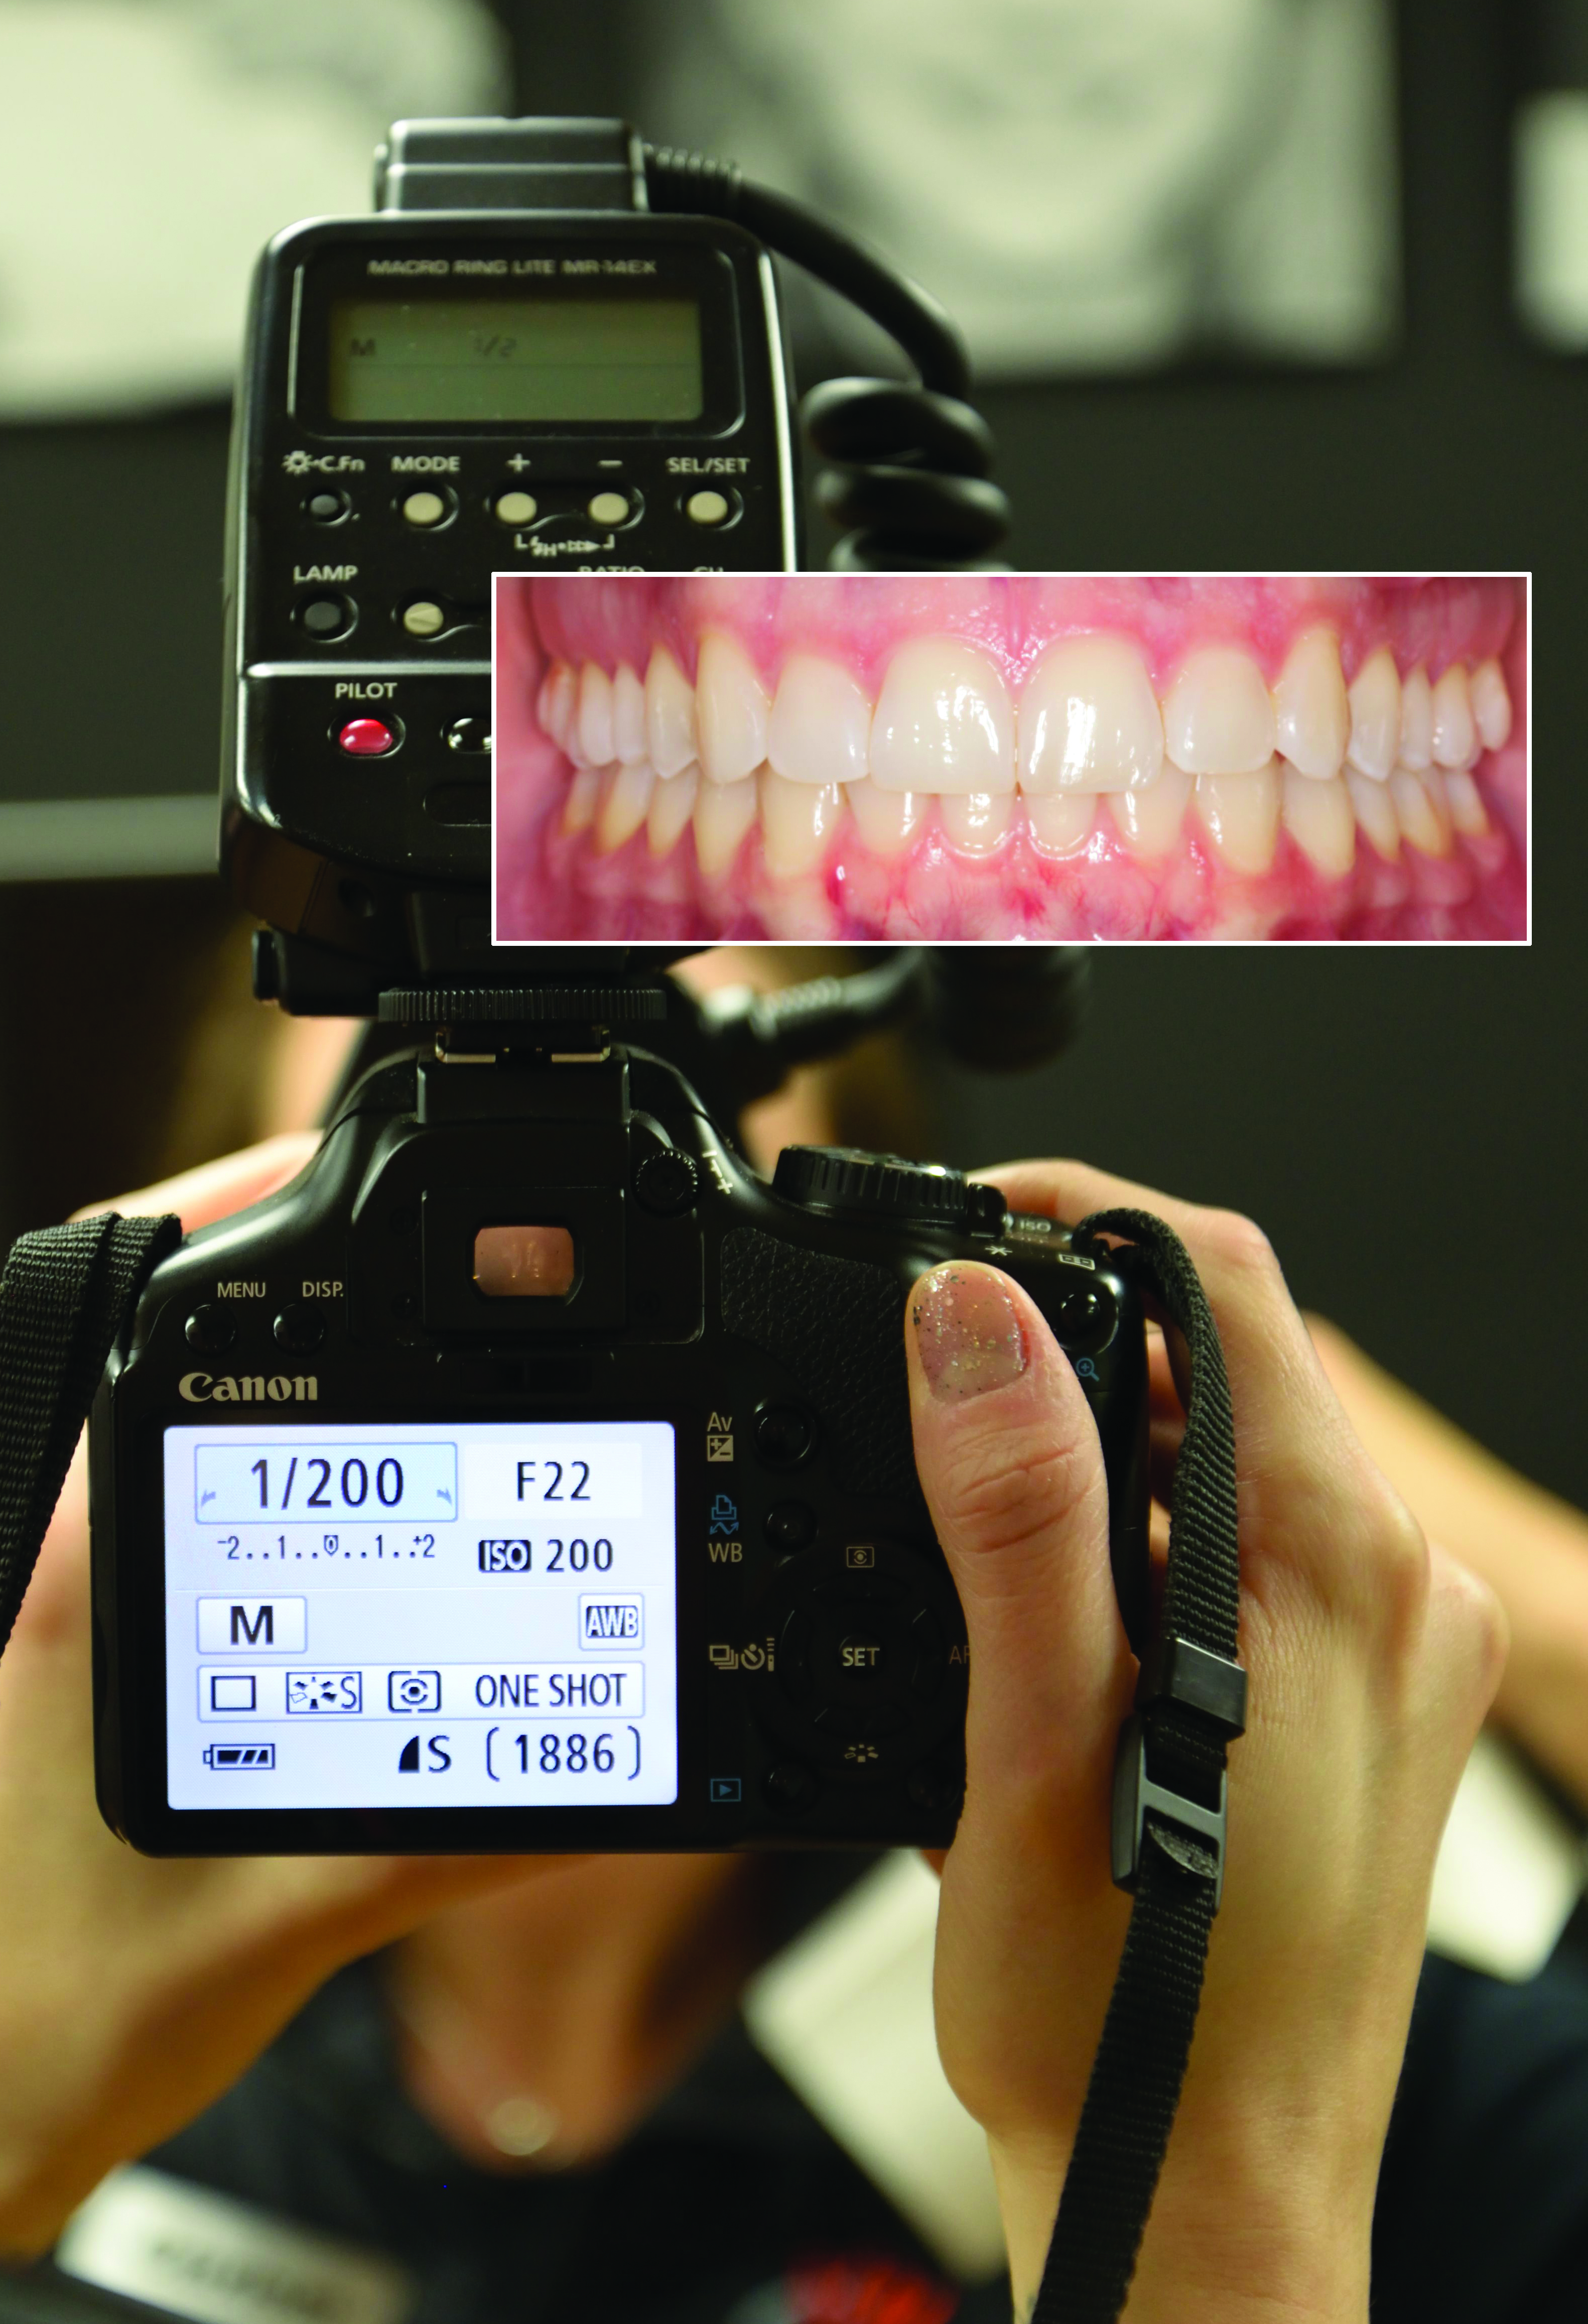
Figure 1: Using manual control, we are able to take a properly exposed image by changing our F/Stop to F22 and leaving our shutter speed on 1/200 and ISO on 200.
By Jeff Kozlowski, DDS, and Mary Estes
After an article profiling our practice and how we used photography appeared in Orthodontic Products (February 2013), there have been many questions regarding camera settings and how to get the best photos possible.
While considerable thought goes into taking a perfect photo, it doesn’t have to be hard. The main goal for orthodontic photography is to see all the teeth clearly and in focus from the proper angle. Many people take dental photos using their camera on automatic mode because it is easier. Sometimes you will get an OK image based off of the camera’s automatic calculations for how the image should look, but what about when the photo does not come out right? What do you change?
The challenge with taking intraoral photos with automatic camera and flash settings is that the camera is interpreting all the factors and choosing how to take the photo. This can be problematic because the camera is automatically selecting what to focus on and how much light should be let in. The camera varies all of the settings to make sure the photo comes out as it sees fit. This can mean different settings for every photo, changing the way your photo turns out from image to image. The result: inconsistent photos.
If you’ve ever taken an intraoral photo where the front teeth are in focus and the back teeth are not, we’re going to explain how to fix that. To create consistency and maintain quality, it’s important to use the camera on the manual setting. By doing this, you are eliminating the camera’s need to “think” about what needs to be adjusted and do so automatically.
In our offices, we use complete manual control over our shutter speed, ISO, F/Stop, white balance, and flash. Doing so allows us to modify for different lighting conditions to get the best-looking images while consistently getting the same focus and light for every patient’s photos at every visit. If this all sounds foreign to you, don’t worry. It’s really not that complicated.
Getting Started
Let’s start by reviewing what equipment and settings we use in our office. We use a Canon EOS Rebel XSI, Canon Macro Lens LF 100 mm 1:2.8, and Canon Macro Ring Lite MR014EX. As far as settings, it’s all about the light in the space where you are taking photos. You may need to vary your camera settings in your office based on individual lighting conditions, but in our practice we use the following:
- Flash: Manual – ½ second
- F/Stop: variable (see below)
- Shutter Speed: 1/200th of a second
- ISO: 200
- White Balance (WB): Flash
- Auto Focus: Manually select the center of the image
Switching from automatic to full manual control over your camera isn’t complicated; it’s a balance of adjusting the three main components to create a properly exposed image: F/Stop (aperture), shutter speed, and ISO. When you have a properly exposed image and you change one of these three components, you need to modify one of the other components in order to keep the image properly exposed.
Think of a properly exposed image like leveling a tripod. In order to get the tripod level on any surface, you have to adjust each one of the legs until it is sitting level. The settings we use are specifically designed to make sure that the center intra-oral image has the deepest depth of field/focus so that all of the teeth can clearly be seen. In our office, we do this by keeping our shutter speed at 1/200th of a second and the ISO on 200 so we only have to vary the F/Stop as we take photos.
What to Know
Here is a breakdown of the different components:
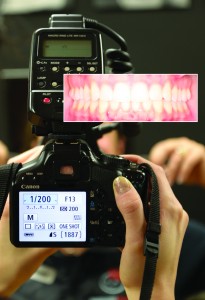
Figure 2: A larger F/Stop—F13—on the same photo, allows too much light in and washes out the image.
Flash Settings: The flash settings determine how much light is let out by the flash and for how long when the shutter opens to snap a photo. It is important to use the manual mode for your ring flash. If you’re using automatic settings, the auto setting on your flash can be the worst offender for creating inconsistent images. If you use auto flash (commonly displayed as TTL or ETTL), the camera automatically adjusts the output of the flash (how much light for how long) based on how you change the other settings in the camera.
As you change the F/Stop, the camera is auto-adjusting the flash to compensate, and this can lead to an endless cycle of not being able to get a properly exposed photo. You may end up with photos that are too dark, too bright, or with sections that are completely washed out. Unless you take your flash off automatic mode, the flash will continue to self-correct however it interprets it should.
Another benefit to manually adjusting your flash output is the impact it has on your flash battery life. The smaller and shorter a blast of light the flash gives off, the longer your batteries are going to last. If the flash is used at a higher power for longer, it can significantly decrease the life of your batteries.
ISO: We keep the ISO on our cameras set at 200. The ISO is the sensitivity of the image sensor to the light let in through the lens when the shutter is opened to take a picture. The lower the ISO number, the less grainy the image appears. The higher the number, the grainier the image appears. A higher ISO is used where there is low light to achieve a better-exposed photograph while still being able to maintain a fast shutter speed and avoid a blurry image.
For controlled lighting situations where there is generally plenty of light, such as in orthodontic offices, the ISO can remain low to maintain the clarity or sharpness of the image. The ideal ISO for intraoral images would be from 100 to 400 and can be varied based on the lighting conditions in your office.
Shutter Speed: The shutter speed determines the amount of time the camera’s shutter is open, which is how long the image sensor is exposed to data. When the shutter is open, it allows the image sensor to record the data for your image. The longer it is open, the more light is let in; the shorter it is open, the less light is let in. If you have ever taken a photo at night, you can hear how long the shutter stays open; if the camera isn’t held completely still, you can also see the blur in the image from motion while the shutter was open.
Shutter speed is used in combination with aperture (controlled by the F/Stop function) and the ISO (sensor sensitivity) to create the perfect exposure on an image. The faster the shutter (1/2000), the shorter the amount of time it is open and the less light it lets in. The slower the shutter (1/20), the longer it is open and the more light it lets in.
With a slower shutter, you also increase the likelihood of blur due to movement of the photographer or the subject; this is why you want to keep a generally fast shutter speed for the intraoral photos. If you were to increase the length of time the shutter is open so that you could lower the ISO, you would also be increasing the susceptibility of the image to blur.
F/Stop: The F/Stop is our only variable component and may be the most important. We set the other components in our office and vary our F/Stop based on the lighting conditions in our office where the photos are being taken. Essentially, the F/Stop is adjusted based on the amount of light. The F/Stop is measured in fractions: 1/32 displays on the camera as F32.
The lens has a diaphragm in it that controls the amount of light that is allowed through the lens and recorded by the image sensor. The F/Stop refers to the size of the hole allowing light in; it controls how big or small that hole is. The higher the number displayed on the camera (F32), the smaller the diameter of the diaphragm in the lens. This means that less light is let in and that there is a larger depth of field/focus. The smaller the number displayed on the camera (F7.1), the larger the diameter of the diaphragm in the lens. This means that more light is let in and that there is a more shallow depth of field/focus.
In our offices, we keep the ISO on 200 and shutter at 1/200 so we can vary the F/Stop to keep our photos properly exposed. Using F7.1 gives us a properly exposed facial photo. Adjusting the F/Stop to F32 allows for a properly exposed intraoral center photo with full depth of field so that all the teeth are in focus.
This sounds like a lot, but to get used to how varying the F/Stop will change your images you can start by shooting your center and incisal images with F32, buccals with F29, and occlusals with F25. Vary the F/Stop up or down until you get a nice exposure. Remember: if it’s too bright, you want the diaphragm in the lens to be smaller, so you want to change the F/Stop to a higher F#, such as going from F29 to F32, because it is measured in fractions and is actually 1/29 and 1/32.
The frontal rest, smile, oblique, and profile pictures should be shot on a much larger aperture like F7.1 or F8.0. These settings will vary based on the lighting conditions in your office and will also vary from camera to camera. In addition, they will likely be different if you’re using a different camera, lens, and flash than what is used in our office.
Also Keep in Mind
A couple more important settings to consider are the white balance and the auto focus point selection.
White Balance: While taking photos with a flash, the default white balance should be on the flash setting. Changing the white balance to a different setting tells the camera to compensate for the tones that are put out by that type of light and can lead to discoloring in your image by giving it a different tone. For example, using the fluorescent setting can make the image appear more blue or cool, and using a cloudy setting can make the image appear more yellow or warm.
Auto Focus Point Selection: For more advanced control over where the camera focuses, you can vary the auto focus point selection to override the camera from automatically choosing where to focus. When you have the camera set to “auto select,” the camera is choosing what to focus on when you half-press the shutter button, and it often may select the lips instead of the teeth, making the lips the sharpest part of the image. Selecting the position manually tells the camera what area in the viewfinder you want the camera to focus on when you half-press the shutter button.
If you know that the camera is always going to choose to focus on whatever is in the center of the viewfinder, this allows you to have control over what it focuses on. If you are having trouble with the teeth not being in focus, try changing the auto focus point selection to “manual” and choose the center of the image as the auto focus point. As you are setting up for your image, you can look through the viewfinder (the eyepiece) and you can put whatever needs to be in focus in the center of the viewfinder and half-press the shutter so the auto focus can focus on this area.
Once it is in focus, you can keep the shutter half-pressed and recompose the image. For example, half-press the shutter with the teeth in the center of the image, and then shift the camera to the left so that the teeth fill up the entire frame. When you fully press the shutter, it will snap the photo and retain the focus from the earlier positioning. This allows you to center the teeth in the middle of the picture, where you can half-press the shutter button to guarantee focus and then readjust the position of the camera to capture the shot while keeping the teeth in focus.
Every camera is going to vary slightly with how it works and what settings will work best in your office. However, the main components are the same: flash, ISO, shutter speed, and F/Stop. Whatever the equipment you are using or the lighting conditions in your office, you will most definitely get more consistent and better-quality images by switching from the auto mode of your camera to full manual control.
Remember: the goal is to get the smallest F/Stop that will give the greatest depth of focus for your center intraoral image, allowing all of the teeth to be clear and in focus. By finding the right balance of ISO and shutter speed, you can make the F/Stop the only variable you need to change. While auto works great with some photos, it doesn’t always work and it creates inconsistent images.
It takes a little practice to determine which settings will work best for you, but once you get the hang of it, you will be able to capture better-quality images consistently. OP
____________________________________________________________
 Jeff Kozlowski, DDS, is world renowned for his unique perspectives on clinical efficiency and quality orthodontic treatment results. Clinical photography is a cornerstone of his practice as digital photos are taken of every patient at every visit.
 Mary Estes has been a treatment coordinator for Kozlowski since 2012. She has an extensive background in communications and relationship management. She is a self-taught photographer in her free time.